If you perform Git operations and try to authenticate using the account username and password, you will get an error remote: Support for password authentication was removed on August 13, 2021. Please use a personal access token instead.
In this tutorial, we will look at what is remote: Support for password authentication was removed. Please use a personal access token instead and how to resolve with different operating systems.
What is remote: Support for password authentication was removed on August 13, 2021. Please use a personal access token instead?
Starting from August 13, 20201, GitHub no longer accepts account passwords when authenticating and performing Git operations.
Hence if you are performing any Git operations such as git pull, git clone, git push etc., you will get an error from GitHub stating
remote: Support for password authentication was removed on August 13, 2021. Please use a personal access token instead.
remote: Please see https://github.blog/2020-12-15-token-authentication-requirements-for-git-operations/ for more information.
fatal: unable to access “…” : The requested URL returned error: 403
How to fix remote: Support for password authentication was removed?
Since we cannot use account passwords when authenticating git operations, we can fix this issue by generating the PAT(Personal Access Token) in GitHub and using the PAT as authentication for Git operations.
Official Announcement from GitHub
- For developers, if you are using a password to authenticate Git operations with GitHub.com today, you must begin using a personal access token over HTTPS (recommended) or SSH key by August 13, 2021, to avoid disruption. If you receive a warning that you are using an outdated third-party integration, you should update your client to the latest version.
- For integrators, you must authenticate integrations using the web or device authorization flows by August 13, 2021, to avoid disruption. For more information, see Authorizing OAuth Apps and the announcement on the developer blog.
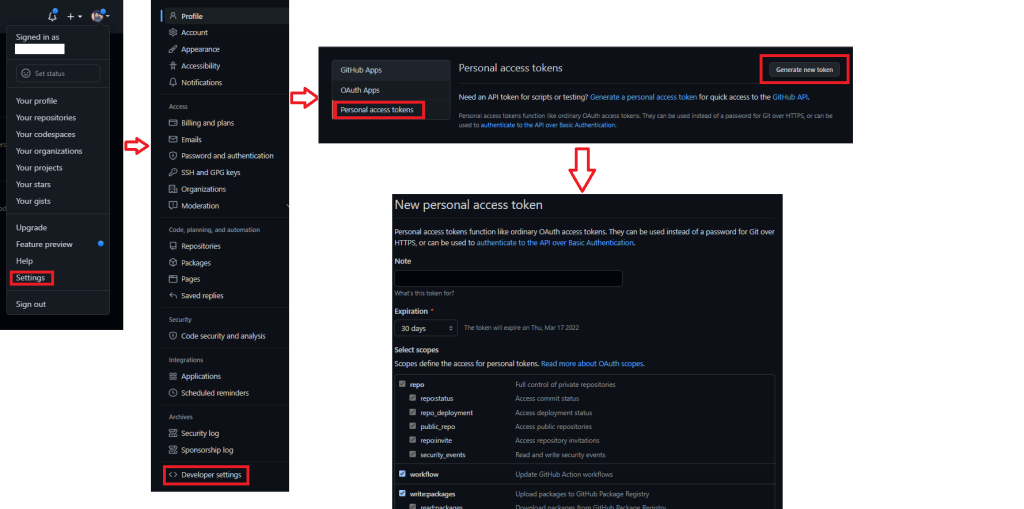
How to Create Personal Access Token(PAT) on GitHub?
Now that we know the issue and the solution let us generate and use Personal Access Token in various environments.
Step 1: Log in to Github
Step 2: Click on the GitHub Profile icon on the right-hand corner
Step 3: Click on Settings
Step 4: On the settings page, Click on Developer Settings
Step 5: On the Developer settings page, click on the Personal Access token
Step 6: Click on Generate New Token to start creating Personal Access token
Step 7: Select the Token expiration according to your need. Avoid No expiration for stronger security.
Step 8: Select the desired scopes to grant to the generated token.
Step 9: Click on Generate token to create a new token.
Step 10: Copy and use the newly generated token to authenticate and perform Git operations, as shown below.

Solution for Windows Users
Step 1: Go to Credential Manager from Control Panel
Step 2: Select windows credentials
Step 3: Click on Add a Generic Credentials if you add it for the first time. Otherwise, find git:https://github.com and click on edit to modify the credentials.
Step 4: On the internet/network address, add the git:https://github.com
Step 5: On the username field, enter your Github username, and in the password field, enter the Personal Access token which you generated from the above steps
Step 6: Click ok to save the Credentials.
Solution for MacOS Users
Step 1: On the menu bar, click on the Spotlight icon and type Keychain access
Step 2: Select the KeyChain app and search for github.com (if there are multiple GitHub logins, then choose Kind: Internet password), double-click it.
Step 3: Click on show password.
Step 4: Replace the password with the generated token and click save changes.
Solution for Linux Users
Step 1: Configure the local git client with a username and email address by running the below command
$ git config --global user.name "your_github_username"
$ git config --global user.email "your_github_email"
$ git config -l
Step 2: Clone the GitHub repository using the below commands
$ git clone https://github.com/YOUR-USERNAME/YOUR-REPOSITORY
> Cloning into `itsmycode`...
$ Username for 'https://github.com' : username
$ Password for 'https://github.com' : give your personal access token here
Step 3: Cache the token in your computer with the below command so that every time you don’t have to enter
$ git config --global credential.helper cache
Step 4: You can now perform all the Git operations
Note: In case you want to remove the cache, use the below command to unset the credentials cache.
$ git config --global --unset credential.helper
$ git config --system --unset credential.helper
Developers Hack Bonus
This is the easiest and shortcut way that works in all the environments (Windows, Linux and macOS).
Step 1: Use the below command to set the remote repository URL.
git remote set-url origin https://<githubtoken>@github.com/<username>/<repositoryname>.gitStep 2: Clone the repository by running the below command. Replace the username, token and repo name with the one you are using.
git clone https://<username>:<githubtoken>@github.com/<username>/<repositoryname>.gitNote: The main drawback of this approach is you need to perform this activity each time you clone a new repo. Hence it becomes tedious if you are working on multiple repoistories and it is not a secured approach.
![[Solved] The Unauthenticated Git Protocol On Port 9418 Is No Longer Supported 3 The Unauthenticated Git Protocol On Port 9418 Is No Longer Supported](https://itsmycode.com/wp-content/uploads/2022/04/the-unauthenticated-git-protocol-on-port-9418-is-no-longer-supported-390x290.png)
![[Solved] Remote: Bitbucket Cloud Recently Stopped Supporting Account Passwords For Git Authentication 4 Remote: Bitbucket Cloud Recently Stopped Supporting Account Passwords For Git Authentication](https://itsmycode.com/wp-content/uploads/2022/03/remote-Bitbucket-Cloud-recently-stopped-supporting-account-passwords-for-Git-authentication-390x290.png)


![Fatal: Refusing To Merge Unrelated Histories [Solved] 8 Fatal: Refusing To Merge Unrelated Histories](https://itsmycode.com/wp-content/uploads/2021/08/git-fatal-refusing-to-merge-unrelated-histories.png)